Monthly Archives: March 2016

4-1. Calendar alarm overview

* Synchronization with Google Calendar has been discontinued as of March 31, 2021.

cloudiss is able to sync with Google Calendar and set alarms at the starting time of the first event on each day(*). See the below image for examples.
* Alarms are created for the next 7 days during each update (synchronizing with Google Calendar).

screenshot of Calender alarm overview

In this example, cloudiss is set to synchronize from 8:00am to 12:00pm* (you can change this period) with the calendar and if there are events that start during this period, an alarm is set at the time of the first event of  each day. *e.g. an event that starts 7:59am is not synchronized but an event that starts at 12:00pm is synchronized in this example.

You can also set alarm offset hours to create alarms before the event’s starting time.
e.g. In the above case, Monday’s first event starts at 10:00 and the offset is 2 hours, so the cloudiss app will set the alarm for 8:00am.

3-3. Edit, activate/deactivate and delete alarms

Make sure your cloudiss app and cloudiss are connected when you would like to perform the below commands.

3-3-1. Edit alarm

To change stored alarm time, repeating day or title, tap thee alarm time you would like to edit and go to the alarm edit screen. Follow the instructions in chapter 3-2.

3-3-2. Activate or deactivate alarm

If you would like to keep the alarm settings but deactivate temporarily, you can switch the activate/deactivate slider on the right of each alarm time.

When you create new alarm without repeat days, it will be deactivated automatically after the scheduled time.

3-3-3. Delete alarm
There are two ways to delete an alarm.

  • Delete from the alarm list
    a. Tap the [-] icon and a red [-] will show on the left of each alarm time.
    screenshot image for delete alarm
    b. Tap the red [-] next to the alarm you would like to delete.
    c. Tap [Delete] for final confirmation.
    screenshot image of delete confirmation
    to exit delete mode, tap [-] (not the red one) again.
  • Delete from edit screen
    a. Tap the alarm time you would like to delete.
    b. Tap [Delete].
    screenshot of delete alarm from edit
    c. Tap [OK] on the confirmation dialog window.

3-2. Setting the alarm

Overview

Follow these simple and easy steps to set a basic alarm.
Tap the [+] button on the top-right of the basic alarm screen.
screen shot of basic alarm setting

1. Set the alarm time

Swipe up and down to the time you would like to set.
screen shot of basic alarm set

2. Day repeat (option)

If you would like to repeat the alarm on a specific of day of the week, tap the [Repeat] section and select the day of the week the alarm will repeat on the next screen. Then tap [✓] to save or [x] to cancel setup.
schreen shot of day of the week selector

3. Title (optional)

Tap the [Title] section and enter the title that will be read out loud when you stop the alarm. The title has a limit of up to 50 characters. Then tap [OK] to save or [Cancel] to cancel.
screen shot of title editor

Finish setting the above values, then tap [✓] to save and store in cloudiss or [x] to cancel setup. After the alarm is saved correctly in cloudiss, a [Completed] message will displayed.

3-1. Basic alarm feature overview

The basic alarm feature includes normal alarm function (set alarm time and repeat alarm on set days) and more.
Note: To save the alarm time and frequency, you have to connect the cloudiss app to your cloudiss.

  • Alarm time
    You can set the alarm time as you wish.
  • Repeat day
    You can set what days of the week the alarm will repeat.
  • Alarm schedule title for text to speech
    This title will be read out loud when you stop the alarm.

Once the alarm time is set and stored in cloudiss, the alarm will sound even if your cloudiss app is not running or your smartphone is turned off.

2-3. cloudiss App Background Tasks

These features of cloudiss app work as background tasks on your smartphone if and only if the cloudiss app is running.

– Text to speech for schedule details and push notification
– Update the alarm schedule after changing the original schedule in Google Calendar.
– Low battery warning
iOS apps can run in the foreground or background. If a user presses the home button or the iOS device enters sleep mode, the app will go to background mode but still work. Background apps can be completely exited, in which case the above features will stop working, please be aware of this when completely exiting the cloudiss app.

2-2. cloudiss App Overview

1. Main view

cloudiss app has 3 main screens and you can move to each screen by swiping left or right.

  • Stored alarm list screen
  • Basic alarm settings screen
  • Google Calendar synchronized alarm (hereinafter known as “calendar alarm”) settings screen
  • On all screens, there is a battery status indicator (see Battery status) and a general settings button (see chapter 5).

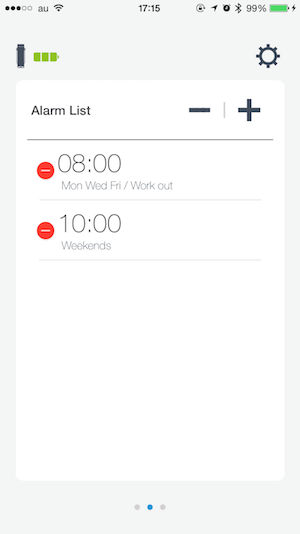
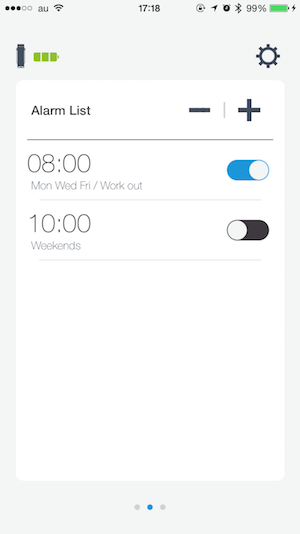
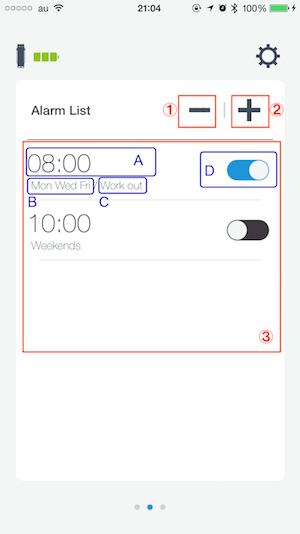
    2. Stored alarm list screen

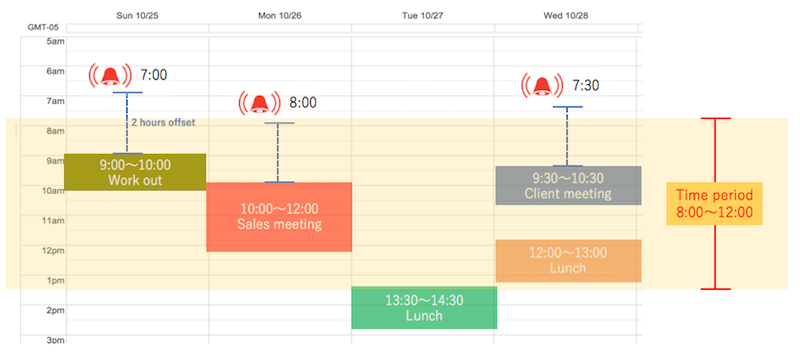
    This screen shows the stored alarm schedule for the next week. You can check the “basic alarm” and “calendar alarm” schedule which has already been set in cloudiss. All days in the week will be displayed even if there is no alarm scheduled for that day.

    [Stored alarm list screen guide]
    1. Tap this button to show all of the scheduled alarms if there are two or more alarms scheduled for each day.
    2. Alarm list area, the next 7 days are displayed.
    3. Black text indicates a “basic alarm” is scheduled. Below the alarm time, the day of the week and text label are noted if set.
    4. Blue text indicates a “calendar alarm” is scheduled. Below the alarm time, the schedule description from Google Calendar is noted.
    5. This icon indicates there are two or more alarms set for this day. Tap the icon and this area will expand to show the full alarm schedule.

    screenshot of alarm list in English

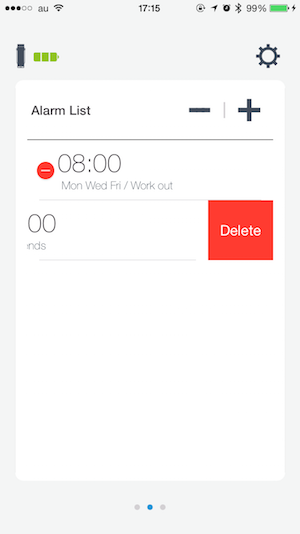
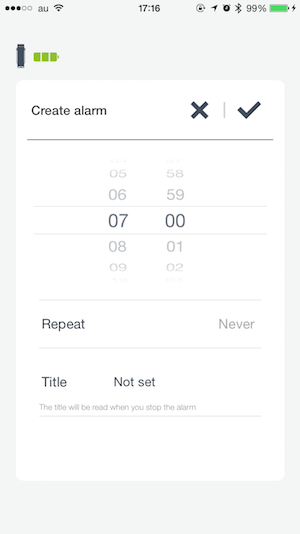
    3. Basic alarm settings screen

    On this screen, you can set/edit/delete a “basic alarm”.

    [Basic alarm settings screen guide]
    1. Delete alarm from schedule
    2. Add alarm to schedule
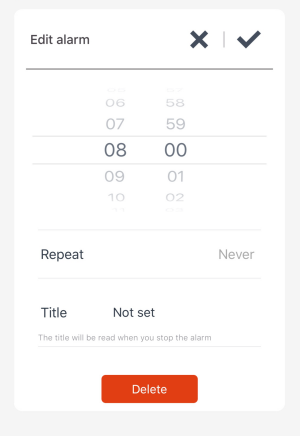
    3. “Basic alarm” settings area
    3-A. Alarm time
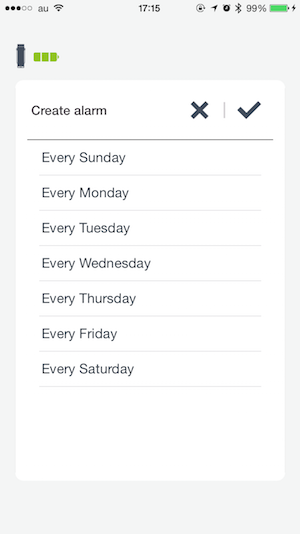
    3-B. What day of the week this alarm will repeat
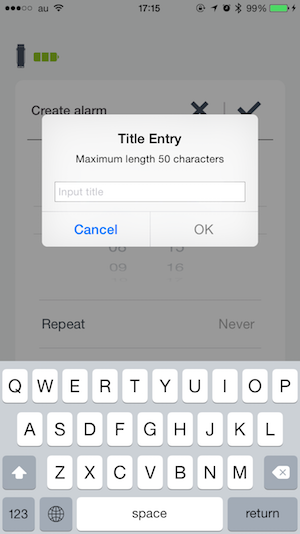
    3-C. Alarm name
    3-D. On/off switch for this alarm

    Also see chapter 3 for more information.

    screenshot of basic alarm setting view

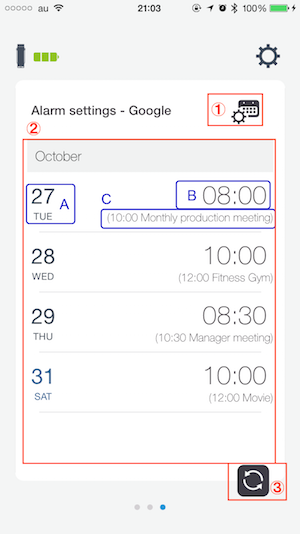
    4. Google Calendar synchronized alarm settings screen

    On this screen, you can configure which calendar you would like to sync and how to synchronize (sync start/end time, offset hours) your calendar. The alarm schedule as a result of your synchronization settings will also be displayed.

    [Calendar alarm settings screen guide]
    1. Tap this button to select which Google Calendar you want to sync with and also how to sync.
    2. “Calendar alarm” list area
    2-A. Alarm date
    2-B. Alarm time
    2-C. Schedule description from Google Calendar
    3. Forcibly sync with Google Calendar. Use if you would like to update the alarm schedule immediately after changing your Google Calendar schedule.

    Also see chapter 4 for more information.

    screenshot of google calendar sync

    5. Battery status

    At the top-left of every screen, the battery status icon is displayed.

    – This indicates the cloudiss app is connected to cloudiss and able to operate (set alarm, sync to Google Calendar etc.).
    battery status pictogram for cloudiss app

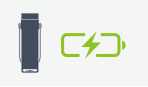
    – This indicates the cloudiss app is connected to cloudiss and charging.
    battery status pictogram for cloudiss app

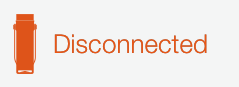
    – This indicates the cloudiss app was previously connected to cloudiss but actually cannot currently connect because cloudiss is turned off or too far from your smartphone.
    Disconnected_en_MN

    – This indicates your smartphone’s Bluetooth feature is disabled. Go to your smartphone’s settings screen and enable Bluetooth.
    battery status pictogram for cloudiss app

2-1. Supported Devices

cloudiss is compatible with iPhone®/iPad®/iPod touch® devices which support Bluetooth® LE and are running iOS8 or greater.

1-5. How to stop an alarm.

cloudiss assist waking up, and you need to shake it actively.
We recommend that it would be better to stop by shaking up and down direction.

You can also stop by app.See 5-2 for more information.

1-4. Initial Setup

  1. Press and hold the function button for at least 4 sec, the blue LED will light up and your cloudiss will be ready for connection to the cloudiss app.
  2. Make sure Bluetooth is enabled on your smartphone and run the cloudiss app.
  3. In the cloudiss app, you will need to select the unique ID of your cloudiss. If your cloudiss’ unique ID is not listed tap refresh to update the list.
  4. Your cloudiss’ unique ID is printed on the warranty card included with your cloudiss, select the corresponding ID and the cloudiss app will be connected.
  5. If the connection is succesfully completed you will see the “Registration succesful” page and the cloudiss app will ask if you want to start the tutorial or not. Select [Start guide] or [Close guide] to complete initial setup.

1-3. Overview

If you the rotate wooden cap in a counterclockwise direction you will be able to see and access the indicator LEDs, USB connector, function button and factory reset button.

LED combination in each situation

led combination matrix

  1. These patterns work only when cloudiss is turned on
  2. Blue LED will only light when an alarm is set