Monthly Archives: March 2016

6-1.Unit initialize

If you cannot to connect your app to the cloudiss unit or you would like to connect another smartphone to your cloudiss unit, then you need to reset or initialize the cloudiss unit.
hw_reset_en

Reset

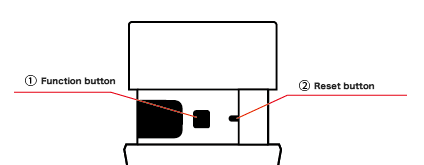
Push the reset button by inserting something with a fine tip (such as a paperclip) until you hear a click. Then make sure the unit can turn on and the app will connect normally.

Initialize

If you cannot recover by resetting your unit, then try initializing it.

Note: all the information stored in the unit will be erased.

Push and hold the function button and push reset button by inserting something with a fine tip (such as a paperclip) until you hear a click.

If the unit starts initializating, the blue LED turn will on and off 16 times. Then re-setup your cloudiss by following the steps in 1-4.

5-5. Other settings

Tap the [Other settings] menu option to stop the buzzer or check other settings.
ta1_cap_other01

The [Other settings] screen has these sub menus.
ta1_cap_other02

System information

You will see the Model number, Serial number and Firmware version of your cloudiss unit in this menu.

Restore firmware

If you need to restore firmware, the app will automatically suggest restoring and you will select this menu manually.

Stop buzzer

If you need to stop the buzzer immediately, this menu will stop the alarm without shaking your unit.

View the online manual

You can read this online manual from your iOS device.

View the quick guide

You can see the quick guide to use the basic features of this app.

View the product website

View cloudiss’ product website – http://cloudiss.cerevo.com/en/

5-4. Reset application

Tap the [Reset application] menu option to erase all the settings stored in the cloudiss app.
e.g. you will need to reset when you would like to use another cloudiss unit.
ta1_cap_resetapp01

Tap [Reset].
ta1_cap_resetapp02

Note: your cloudiss unit save your iOS device information even if you reset your app. If you would like to switch to a new smartphone, you will need to initialize your cloudiss unit. See 6-1 for more information.

5-3. Firmware update

Tap the [Firmware update] menu option and you can update cloudiss’ firmware.
ta1_cap_firmware00

If there is new firmware available, you will see the [Update now] button on the [Firmware update] screen, tap this button to update. DO NOT terminate the cloudiss app or turn off your cloudiss unit while updating.
ta1_cap_firmware01

When the update is finished, cloudiss will turn off automatically, please manually turn cloudiss back on after this happens.

If the update fails, follow the instructions on screen to repair the firmware.

5-2 Buzzer settings

In buzzer settings, you can change the sound pattern, volume, alarm stop shake count and alarm stop shake intensity.

Sound pattern

You can change the sound pattern in this section. Tap [<>] to change and tap the [Test] button at the bottom of the screen to check the tone. There are 3 patterns available for selection.
ta1_cap_buzzer01

Alarm volume

You can change the volume by using the slider (blue circle) and tap the [Test] button to check the volume level.
ta1_cap_buzzer02

Alarm stop shake count

You can set how many times you need to shake cloudiss to stop an alarm.
Tap [-] or [+] and then select from Easy, Normal or Hard.
ta1_cap_buzzer03

Alarm stop shake intensity

You can set how intensely you need to shake cloudiss to stop an alarm.
Tap [-] or [+] and then select from Easy, Normal, Hard or Very Hard.
ta1_cap_buzzer04

If you changed any of these settings, make sure to tap [✓] to save your settings.

5-1. Settings and update

Tap the [Settings] icon on the top right of the [Alarm list] or [Alarm settings – Google] screen then you will see the general settings menu.

ta1_cap_googlecalendar17

These are menu options on the [Settings] screen.
ta1_cap_googlecalendar18

  • Buzzer settings
  • Firmware update
  • Reset application
  • Other settings

4-5. Disable Google Calendar alarm

If you would like to be disable the Google Calendar alarm, follow these steps.

  1. Tap the settings icon(calendar with gear) on the top right of the [Alarm settings -Google] screen.
    ta1_cap_googlecalendar03
  2. Tap [Disable Google Calendar].
  3. You will see this screen after deactivation is finished.
    ta1_cap_googlecalendar16

Note: This action will also delete the entire calendar alarm schedule.

4-4. Google Account sign out

To sign out of the active Google Account, follow these steps.

  1. Tap the settings icon (calendar with gear) on the top right of the [Alarm settings -Google] screen.
    ta1_cap_googlecalendar03
  2. Tap [Setting/Sign out].
    ta1_cap_googlecalendar12
  3. Tap [Google sign out].
    ta1_cap_googlecalendar15

Note: Signing out of Google will also delete the entire calendar alarm schedule.

4-3. Update Google Calendar data

The cloudiss app will sync for the next 7 days with your Google Calendar schedule. It will update automatically, or you can also update manually.

Note: the cloudiss app will need to connect to both the internet and cloudiss unit to update.

Manual update

Tap [Sync with alarm] or the sync icon (circle arrow) to update Google Calendar sync manually.
ta1_cap_googlecalendar13
ta1_cap_googlecalendar14

Automatically update

cloudiss will try to update automatically using 3 possible methods.

  1. Approx. 3 days since the last update, while you run the app and connect to your cloudiss unit.
  2. When you change the iOS timezone (e.g. overseas travel or other reasons), while you run the app and connect to your cloudiss unit.
  3. You have left the app running as a background process on iOS, updating can occur at any time.

Additionally, if you have turned on push notifications for this app, the cloudiss server can send push notifications to the app that will update the calendar –

  • A few minutes after you add/delete/modify the Google Calendar which is synchronized with the cloudiss app.
  • Approx. 3 days since the last update and at a certain time every day.

Caution

cloudiss will update if  the app can connect to internet and to the cloudiss unit.

cloudiss can possibly to fail to update for these reasons.

  • You terminate the cloudiss app manually.
  • iOS forcibly terminates the cloudiss app.
  • Your iOS device cannot receive push notifications.
  • Cerevo’s cloudiss server cannot send push notifications.

It is recommended you to check the [Alarm settings – Google] screen before going to bed if you have an especially important appointment or event the next day.

4-2. Calendar alarm configuration

Google authentication

First, you will need to login with your Google account. Go to the [Alarm settings] screen and tap [Google Sign in].
ta1_cap_googlecalendar01

Sign in to your Google account.
Note: Your Google password is not stored on our server.

image of GoogleLogin

Google will then confirm you want to grant permission for the cloudiss app to access your Google account. Confirm and tap [Allow].
ta1_cap_googlecalendar02

Configure synchronization

Select your calendar

Tap the settings icon (calendar with gear) on the top right of the [Alarm settings -Google] screen.
ta1_cap_googlecalendar03

Tap [Select calendar] and select the calendar you would like to sync with. Then tap [✓] to save settings or [x] to cancel.
ta1_cap_googlecalendar04
ta1_cap_googlecalendar06

Set time period and set sync offset hours

Tap the [Time period] section and set the time period and offset hours. Then tap [✓] to save settings or [x] to cancel.
ta1_cap_googlecalendar05
ta1_cap_googlecalendar07

Event title narration settings

If you would like to deactivate [Event title narration], tap [Setting/Sign out] and slide the switch (default setting is “on”).
ta1_cap_googlecalendar12
CalendarLogout_en_MN

Save settings

You will see red text the first time you select a calendar, change the time period or change the offset time. Make sure to tap [✓] to save and then the app will send configration data to the cloudiss unit and the text color will change to black to confirm the settings have been sent correctly.
ta1_cap_googlecalendar08
ta1_cap_googlecalendar09
ta1_cap_googlecalendar10
ta1_cap_googlecalendar11